3) Adding and Editing Content
In order to add and edit the content of your site, you will create and make changes to a number of files called Markdown files. These are files that end in the file extension .md, and they include index.md file as well as all of the files in _pages and _projects.
Each of these files has two main sections:
- Front matter, which is written in a simple coding language called YAML.
- Content, which is written using Markdown. You can also include some HTML in these files, as Jekyll, the site builder, will convert the Markdown to HTML anyway when it builds the site.
What are HTML, Markdown, and YAML?
HTML, Markdown and YAML are easy-to-read markup languages used to create websites. While you don’t need to know the exact definitions of these three markup languages, it is helpful to understand a little bit about what they do in order to help you build your site.
HTML
You do not need to know the ins and outs of HTML to use this site template, but it can help you edit some of the template’s basic formats. Other articles in the How-To section of the template will show you how to do some things with HTML, like adding embedded content. If you want more information on HTML, check out the W3 Schools resources on HTML.
Markdown
Markdown is a plain-text markup language that makes it easy to format your text. Markdown converts what you write in words into HTML code that web browsers can read. Because it is so useful for writing, Markdown is an integral element to creating pages, projects, and posts on this site. This template has a guide on Formatting Text with Markdown, which you can check out later.
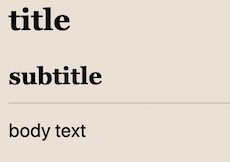
In the code, Markdown looks like this:
# title
## subtitle
body text
This code will display on the website like this:
YAML
YAML (YAML Ain’t Markup Language) is an easy-to-read programming language that stores data on how your site should be built. For example, it can be used to set the titles, layouts, and permalinks of a page on your site, also known as variables. It is important to note that commands written in YAML are sensitive to line indentation.
In code, YAML looks like this:
# Site Settings
locale                   : "en-US"
title                    : "Critical Web Design Toolkit"
name                     : "Digital Scholarship @ Bryn Mawr College"
This is an excerpt of code from the yaml file called _config.yml. This file stores general information on the site as a whole:
- locale: set to “en-US” which means the site’s language uses US English
- title: the title of the site
- name: name or organization, appears at bottom of the page
In the rest of this page, information stored in YAML such as “locale” and and “title” will be referred to as variables.
To learn more about YAML syntax, check out this linked tutorial: “YAML Tutorial: Everything You Need to Get Started in Minutes”.
Using Markdown and YAML together
You may use YAML, Markdown, and HTML together in your pages and projects. When YAML and Markdown are used together, the YAML text or code is located at the top and is called front matter. Front matter is always enclosed by triple-dashed lines like this ---. To include any of the YAML variables on this page, all you need to do is copy and paste them into your front matter.
Editing the Homepage
Let’s take a look at the template’s default index.md file, which Jekyll uses to build the site’s homepage. The front matter in that file looks like this:
---
layout: home
title: Welcome!

header:
    image: /assets/images/home.jpg  # Putting the path to an image here will add that image to this page's header.
    alt: "A large library with tall bookshelves and marble busts." # Describe the header image here
    caption: "[Photo by Alex Block on Unsplash](https://unsplash.com/@alexblock)" # Add a visible caption to your image or give credit to the photographer or source.

sidebar:
    nav: "categories"

include_categories:
  - getting-started
  - how-to

classes: # Setting the class as wide will extend the page's content into the right margin.
---
If you want to use this front matter in any of your own pages or projects, all you need to do is copy and paste it into a new markdown file. While you do not need to know exactly how every variable works, it might be helpful. Below, descriptions are provided for the variables from the index.md file.
Here is what each new variable does:
layout:
- This sets the layout of the page. Since this is the homepage,
layoutis set tohome. Other layouts are located in the_layoutsfile.- If you decide not to include a
layoutcategory on a project (that is, anything in the_projectsfolder), the layout for that page will default tosingle.
- If you decide not to include a
title:
- This sets the title of the page. It will display as a level 1 heading (h1).
header:
- This section is mainly used for setting a large image at the top of the page, but it can also be used to set teaser images for projects, which display on the home page.
- As you can see, the category for
imageis indented. This tells the site that the image belongs to the page’s header section- image: Putting the path (e.g.
/assets/images/home.jpg) to an image here will add that image to this page’s header. - alt: Short for alt text, used to describe an image
- caption: Provides an image caption which is good for citations. Here we included a link to the photographer
- image: Putting the path (e.g.
sidebar:
- By default, the sidebar navigation is set to display on the home page and any project that has the default
singlelayout, but you can remove it on individual pages by addingsidebar: falseto the pages’ front matter. - Instructions for editing the sidebar navigation are located in this site’s Navigation page.
include_categories:
- The bulleted items in this section tell the site which categories of projects to include on this page.
- This separates the home page into sections for each of the categories listed here. The projects that belong to each category will display in galleries in their corresponding section.
- Editing this list also requires editing the
content.ymlfile in the_datafolder. - More on how to edit these can be found as comments in the code in the
index.mdfile.
classes:
- Setting
class: wideextends the page content into the right margin. NOTE: this may cause the table of contents to break. We recommend addingtoc: falseto your page’s front matter if you intend to set the class to wide.
Adding Text
In the home page or index.md file, the rest of the stuff after the enclosed front matter is the file’s content or markdown section. The content looks like this:
Welcome to the Critical Web Design Toolkit—we’re so glad you’re here. The CWDT is a learning resource and template created to simplify the creation of static websites for Digital Scholarship projects. This site was built to live up to our core values of sustainability and accessibility while maintaining an easy-to-use and minimalist design.

Hopefully, the Toolkit not only inspires you to build your best project, but also encourages you to continue your learning journey in web design and development.

To access this site's [GitHub repository, click here.](https://github.com/digbmc/ds-project)
The text content in this section is written in Markdown (the text directly below the front matter that looks like plain, readable text). If you look at the code in the index.md file, you will notice that this section also contains some Liquid (in the curly brackets) and some HTML. This code adds some unique features to the homepage that Markdown itself cannot support. The Markdown text at the top of the section can be safely edited, but the Liquid and HTML code at the bottom should not be changed.
Using YAML for other projects
On other projects, there are several more variables that may be helpful to you that you can include in the front matter:
permalink:
- Creates a path or link to the page
- Each new page or project that you create in markdown needs a permalink
- To learn more, go to step 4, Navigation.
teaser:
- Teaser images are the images that appear in the project galleries on the home page.
- Usually the same as a header image if you have one
- Path specified the same way as header image
- If no teaser is specified for a project, the project’s gallery item will have a solid color background instead of an image background.
header:
    teaser: /assets/images/ocean-teaser-2.jpg
It will appear on the home page like this:
category:
- For projects only
- Controls how projects will be displayed on the homepage
- Projects with the category
"spotlight"will display in wide rectangular boxes directly below the text content on the homepage. - Projects with other categories will be displayed in category galleries beneath the spotlight items, as long as their matching category is listed in the
include_categoriessection of the front matter inindex.md.
category: "spotlight"
toc:
- stands for “table of contents”
- when set to true, automatically generates a table of contents on the side of a page
- when set to false, the table of contents disappears
- By default,
toc: trueis set on all project pages. To override this, addtoc: falseto the front matter on any project.
- toc_label is the title of the table of contents.
toc: true;
toc_label: "On this page"
Creating Your Own Pages and Projects
In your site repository, or location on GitHub, you will find two particular folders, one called _pages and one called _projects. By default, the files in _pages are what appear on the top navigation bar (about.md and feedback.md) of your site, while the files in _projects make up the instructional content that can be accessed from the home page. This may be a good model for structuring your site as well, but this is discussed more thoroughly in our Navigation resource.
Pages
We recommend the use of pages as a place to keep information that provides more general information about the whole website. Examples of pages that fit this description might be an About page or a Contact or Feedback page. Perhaps you want to include a page that lists all of the authors who contributed to the site. That, too, could be a good thing to include in _pages.
Editing Existing Pages and Creating Your Own
You may want to keep the existing about.md file and edit the YAML front matter and content section to be about your site instead. Feel free, also, to delete existing pages.
Pages will appear in the top navigation bar or “masthead navigation”:

To create a new page, create a new Markdown (.md) file in the _pages folder. In your new markdown file, you can copy and paste the front matter from the following example of an “Authors” page or from the code of the existing about.md page to get started.
For example, to create a new page called “Authors,” you would create a new markdown file called authors.md with the following front matter:
---
layout: single
permalink: /authors/ # should match the permalink in the navigation.yml file
title: Site Authors #insert your preferred title here
header:
    image: /assets/images/default-1.jpg  # Putting the path to an image here will replace the header image.
    alt: "Describe your image here" # It is good practice to include an image desription as alt text.
    caption: # Put a caption for your image here. It will display in the bottom right corner of the image.
toc: true #creates a table of contents
toc_label: 3) Adding and Editing Content #label of toc is set to be the page's title
---
Keep in mind that the colors are only in the code to make it easier to read.
Then, once you have configured the YAML front matter to your liking, you can add text formatted with Markdown to the content section of the file.
Projects
Projects are a bit different from pages. You can think of projects like individual blog posts or articles. This is where the main content and collected work that you want to organize and showcase lives on your site.
Looking at this site, our main content is a series of instructional written materials teaching you how to use this template, so all of these files were created in _projects. These can now be seen and accessed from the homepage in an organized way that you specify in the front matter of the index.md file, as discussed above.
Creating Your Own Projects
A good way to start making your own projects is to copy the code of an existing project.
First, though, you should create a file in the _projects section and name it with the following format: 00_filename.md, where you can replace ‘filename’ with whatever name you choose.
- The two-digit number (00_) at the beginning of the filename will determine the order in which the “previous” and “next” buttons at the bottom of each project will navigate through the projects.
- To see examples of file names, check out the files in the _projects folder (01_installation.md, 02_configuration.md, etc)
Second, copy and paste the code from an existing project into your file.
Third, edit the front matter and add your own content, whether it is text, images, or any other content you would like to include. For more information on adding these elements, check out the information in our “How-To” section. For basics on adding text, go to our tutorial on Formatting Text with Markdown.