1) Installation
The Critical Web Design Toolkit is built as a Jekyll site. Jekyll is like a content management system like WordPress but it builds static sites instead of dynamic ones. It helps to create the static site files and then lets an individual host the site like any other website. It has built-in support for Github Pages, making it a very useful tool for building websites.
Github Pages is a static site hosting service which extracts HTML, CSS and JavaScript from a Github repository and then builds and publishes a site based on them.
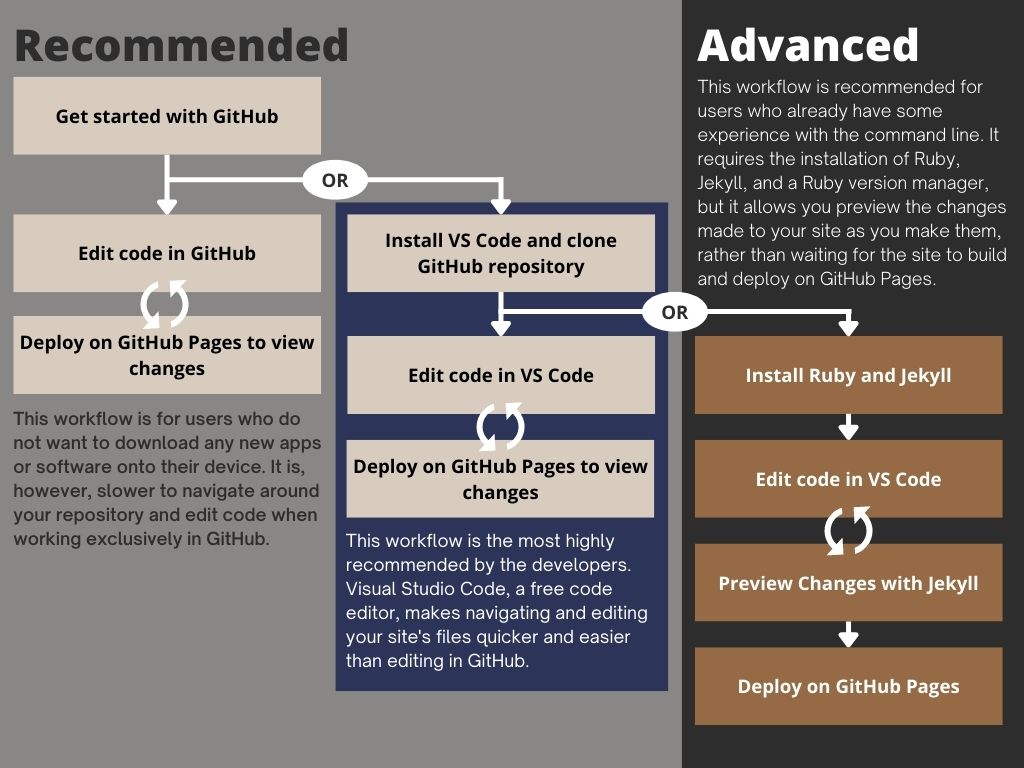
There are three possible workflows that you could follow to use our template after setting up Github.
Setting up Github
GitHub is an online, cloud-based code hosting platform that helps to track and manage changes in code repositories while enabling multiple people to work on a project at the same time.
Follow the steps below to set up github and get started on your first project!
-
Sign up for a Github account.
- To start a project, you have to create a new repository.
- Click on the “new repository” button on the upper right-hand corner of Github.
- Name your repository and check the box that states “initialize this repository with a README” .
- Click on “create repository”.
- When you’re working on a project, it helps to have multiple versions of a repository at the same time. You need to create a branch to be able to edit the multiple versions at once. Everytime you create a new branch, it will be a copy of the main branch where you can make your new changes.
- To start a new branch, in your repository, click the dropdown that reads “branch: master”.
- Type your desired branch name.
- Click “create branch” and then name the branch.
This Github Documentation is a great resource to refer to if you want to learn more about Github.
Recommended Workflows
After setting up Github, you can either code directly in Github or code in a code editor like Visual Studio Code. After coding, you can deploy on Github Pages to view changes in your website which will be further talked about later in this page.
Coding in Github
The workflow that involves coding directly in Github after clicking the “Use this template” button is for users who do not want to download additional softare on their device. However, as stated before, you have to wait for sometime before you can view the changes on your website if you work on Github. It might also make it slower for you to navigate around your repository.
“Use this template” on GitHub
If you want to directly edit the code in Github, you can click on the green “Use this template” button located in the top right of our repository and start working from there. Clicking this button will make a copy of the original repository allows you to experiment with the code without affecting the original repository.

Committing, and Pulling in Github
Committing
After making changes to a file in your branch, describe your changes by writing a commit message at the bottom of the page of that file. This gives a short description of what changes have been made. The reason for having commit messages is to help other web developers understand how the project has progressed over time.
Pull request
If you want the new changes you made in your branch to be merged with another branch, you have to open a pull request. A pull request is a notifying method to let the relevant parties involved in your project know about your request to merge your changes with another branch.
- To open a pull request, go to the “pull request” tab and hit the button that says “new pull request.”
- After ensuring you like the changes you made in the new branch, click the “create pull request” button.
- Title your pull request and briefly describe the changes.
- To finish, click “create pull request.”
- In order to merge the branches, select the “merge pull request” button and click “confirm merge”.
Using Visual Studio Code
The most highly recommended workflow is by using a code editor like Visual Studio Code to code as it makes it easier to edit your website’s files in a more efficient manner compared to working directly in Github. To work on your site using Visual Studio Code, you have to clone the repository first.
If you decide to work locally, clone the repository and open the folder that you cloned from Github on Visual Studio Code and start coding. A major advantage for working locally is that you can preview the changes that you are making to your website almost instantly!
Cloning a repository and working locally
Before cloning a repository and working locally, always fork the repository and work with the new forked repository to avoid changing the code in the main repository. To clone the repository and work locally using a code editor like Visual Studio Code, follow the steps below:
To clone our repository, follow the steps below:
- Open our repository and click on the green “Code” button.
- Copy the link that you see in the HTTPS tab.
- Install Git. This is done using the command line.
- Open git bash and type the following command and press enter.
git clone ***paste the link that you copied in step 2 here*** - See where in your computer the folder got cloned to and then open the folder of the cloned repository on Visual Studio Code and code locally.
Pulling, pushing and commiting on Github through Visual Studio Code
If you want to pull or push changes from another branch to yours, click the “Source Control” button on the left sidebar of Visual Studio Code. Then click on the three dotted lines at the top right of the panel that appears and you will see the pull and push options.
Before you can commit the changes you made, you have to “Stage” your changes. You can do that by clicking on the changes individually and click on the “+” button to stage the changes. After that, you can write a commit message inside the box at the top of the panel and click commit.
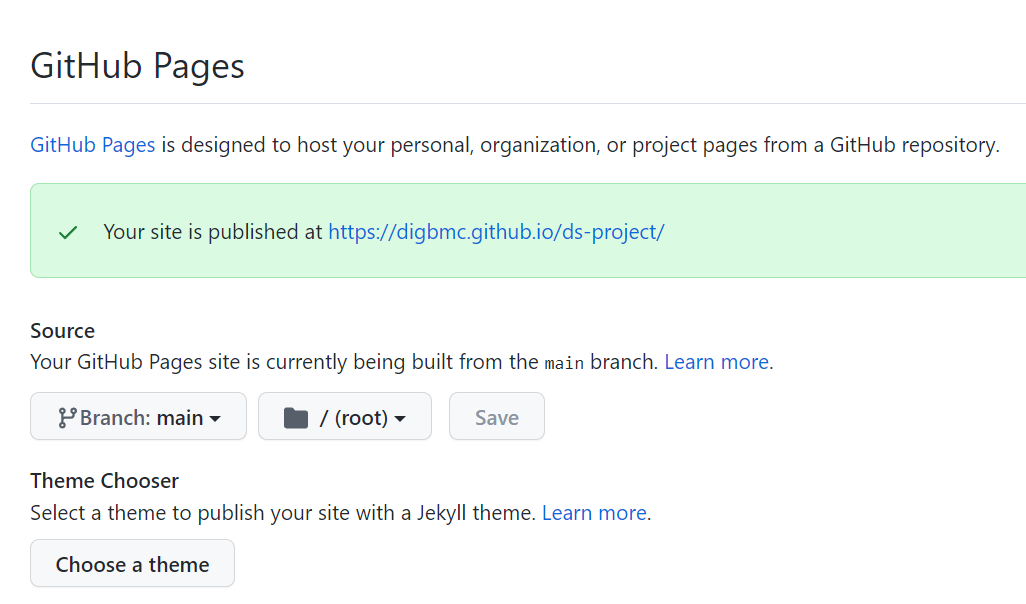
Deploying on Github Pages
Whether you are coding directly in GitHub or using a code editor, you have to deploy your website on Github Pages to preview the changes that you made in your website. To deploy, do the following:
- Go to your GitHub repository.
- Click on the Settings tab, and scroll down to the Pages section under Code and Automation.
- The branch should be configured to gh-pages and the folder set to / (root). If you want the site to deploy from any other branch, you can change the branch from gh-pages to your desired branch. You can use the picture below as a reference.
Advanced Workflow
This workflow can be followed by individuals who already have experience with Jekyll, Github and Visual Studio Code.
Working with Jekyll
Jekyll is a Ruby gem for which you need to install Ruby first. The workflow is broken down into parts which are:
- Install Ruby.
- After installing Ruby, open Ruby and run the command below to install Jekyll.
gem install jekyll bundler
- Fork our github repository.
- Open Visual Studio Code and clone the new repository that you just forked.
- Open the folder of the cloned repository and open a New Terminal from the menu bar on Visual Studio Code. Run the command below to install the gems needed to use this template.
bundle install
- Code in Visual Studio Code and stage the changes.
- You can preview the changes that you made after staging the changes by running this command:
bundle exec jekyll serve
- If you want to update your branch in Github repository with the new changes you made in the local repository, push the changes through Visual Studio Code.
- Once you are satisfied with your website, you can deploy the website!
This documentation has more information about how Jekyll works.
Minimal Mistakes and The Reactor Room
Our template is based on a jekyll theme called Minimal Mistakes. This theme was built with the aim that individuals would use it for hosting their blog sites, personal sites, portfolio etc. The programming languages that are used in this theme include HTML, SCSS, JavaScript and Ruby.
Our Critical Webdesign Template is also inspired by The Reactor Room. This website is a modified version of the Minimal Mistakes theme.